> For the complete documentation index, see [llms.txt](https://support.senterasensors.com/fieldagent-documentation-updates/llms.txt). Markdown versions of documentation pages are available by appending `.md` to page URLs; this page is available as [Markdown](https://support.senterasensors.com/fieldagent-documentation-updates/imagery/import-imagery-in-fieldagent-web.md).

# Import imagery in FieldAgent Web

Upload drone photos, a QuickTile, or a finished mosaic to a field in FieldAgent Web, set the image buffer, and know what happens after the upload.

**IMPORT IMAGERY** in the field view uploads imagery to the field from your browser. It accepts three kinds of data:

| Data type                 | What to upload                                                                                     | What FieldAgent does with it                                                                                                                                                |
| ------------------------- | -------------------------------------------------------------------------------------------------- | --------------------------------------------------------------------------------------------------------------------------------------------------------------------------- |
| **Individual Photos**     | The JPEG or TIFF photos from a drone flight.                                                       | Creates a survey dated from the photos, places a photo dot at each capture location, and builds QuickTile layers. You can then order mosaics and analytics from the survey. |
| **QuickTile**             | A QuickTile you produced elsewhere, for example in FieldAgent Desktop, with its referencing files. | Adds it to the field as a map layer.                                                                                                                                        |
| **Fully Stitched Mosaic** | A mosaic produced by other software, with its referencing files.                                   | Adds it to the field as a map layer.                                                                                                                                        |

Imagery can also be imported from a memory card in FieldAgent Desktop, which does not need a field boundary in advance and can import several fields at once. Use FieldAgent Web when you are not at a Windows PC or the photos are already on your computer.

The demo below is a working, view-only copy of FieldAgent Web with the **IMPORT IMAGERY** form. Follow the steps in the copy, or press **Show me** to watch each one; nothing is uploaded.

{% @fieldagent-demo/embed content="import-imagery" %}

<a href="https://michael-bohman.github.io/fieldagent-demo/demo.html?s=import-imagery&#x26;mode=page" class="button secondary">Open this demo full size</a>

## Before you start

* The field must exist. Create it first if it does not; see [Create a field](/fieldagent-documentation-updates/fields/create-a-field.md).
* If the imagery is for an analytic you have already ordered, import it from the flight task instead, so the order starts processing when the upload finishes. See [Orders and flight tasks](/fieldagent-documentation-updates/ordering/orders-and-flight-tasks.md).
* FieldAgent places each photo using the GPS position recorded in the photo file. Keep the original files from the sensor or drone; copies that have been edited or re-saved may have lost that data.

## Upload individual photos

1. Open the field and click **IMPORT IMAGERY**.
2. Leave **What type is this data?** set to **Individual Photos**.
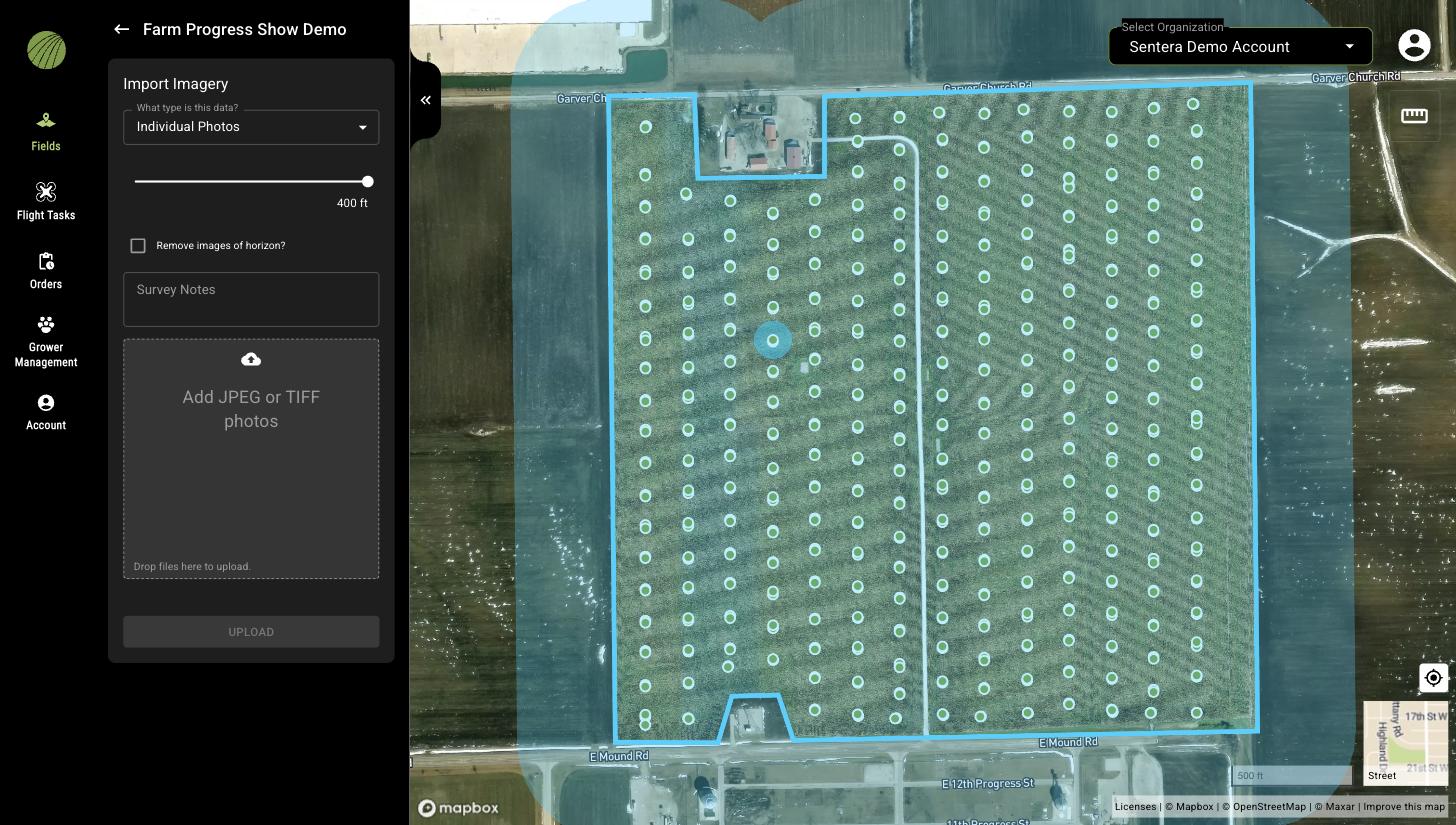
3. Set the image buffer with the slider. The shaded area on the map shows the buffer around the field boundary; photos taken inside it are included in the survey and photos outside it are left out. The default is 400 ft.
4. Select **Remove images of horizon?** to drop photos that show the horizon, such as takeoff and landing shots.
5. Add **Survey Notes** if you want them stored with the survey.
6. Drag the photos into **Add JPEG or TIFF photos**, or click the box to browse for them. Select the photos themselves, not the folder.
7. Click **UPLOAD** and leave the browser tab open until the upload finishes.

<figure><img src="https://4042936416-files.gitbook.io/~/files/v0/b/gitbook-x-prod.appspot.com/o/spaces%2FNnNa4XKy1hMfEEmHLPqZ%2Fuploads%2Fgit-blob-41ce18ea6eaaa43323613a901059366820220c91%2Ffa-web-import-imagery-individual-photos.jpg?alt=media" alt="The Import Imagery form set to Individual Photos, with the buffer slider at 400 ft, the Remove images of horizon checkbox, Survey Notes, and the photo drop zone; the map shows the buffer as a shaded band around the field and photo dots inside it"><figcaption><p>Import Imagery with Individual Photos selected. The shaded band on the map is the image buffer.</p></figcaption></figure>

When the upload completes, FieldAgent processes the photos and sends an email when the survey is ready. The survey appears in **Add Map Layers** under its flight date with **Photo Dots** and the QuickTile layers built from the photos. See [QuickTiles and mosaics](/fieldagent-documentation-updates/imagery/quicktiles-and-mosaics.md) for what you get automatically and what you order.

## Upload a QuickTile or a mosaic

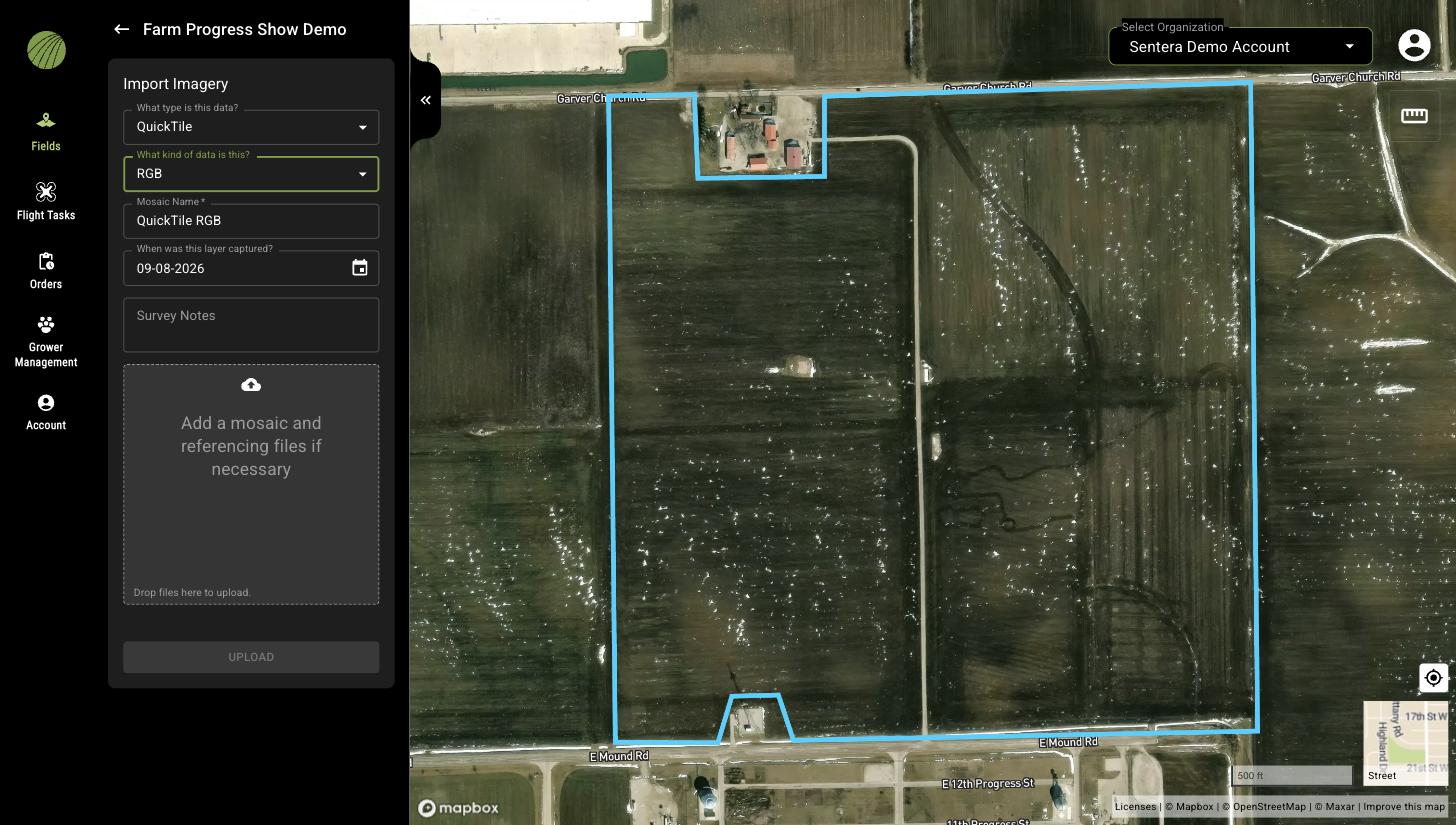
1. Open the field and click **IMPORT IMAGERY**.
2. Set **What type is this data?** to **QuickTile** or **Fully Stitched Mosaic**.
3. Set **What kind of data is this?** to **RGB**, **PRGB**, **NDVI**, or **NDRE**.
4. Edit the **Mosaic Name** if you want something other than the default, and set **When was this layer captured?** to the flight date.
5. Drag the mosaic file and its referencing files into the drop zone and click **UPLOAD**.

<figure><img src="https://4042936416-files.gitbook.io/~/files/v0/b/gitbook-x-prod.appspot.com/o/spaces%2FNnNa4XKy1hMfEEmHLPqZ%2Fuploads%2Fgit-blob-a957b25df65769af2af1c1a5a5b3aca7e5e701ef%2Ffa-web-import-imagery-quicktile.jpg?alt=media" alt="The Import Imagery form set to QuickTile, with What kind of data is this set to RGB, a Mosaic Name, a capture date, Survey Notes, and a drop zone for a mosaic and referencing files"><figcaption><p>Importing a QuickTile. The same form is used for a fully stitched mosaic.</p></figcaption></figure>

## Who can see imported imagery

Imagery is visible to the account that uploaded it and to every account with access to the field. If you import imagery into a field outside your home organization, share the field to yourself so the results appear under **Fields Shared With Me**; see [Share a field](/fieldagent-documentation-updates/fields/share-a-field.md).

## Related pages

* [QuickTiles and mosaics](/fieldagent-documentation-updates/imagery/quicktiles-and-mosaics.md)
* [Order a mosaic](/fieldagent-documentation-updates/ordering/order-a-mosaic.md)
* [Order analytics](/fieldagent-documentation-updates/ordering/order-analytics.md)
* [Photo dots and the image viewer](/fieldagent-documentation-updates/view-and-analyze/photo-dots-and-image-viewer.md)