> For the complete documentation index, see [llms.txt](https://support.senterasensors.com/home/llms.txt). Markdown versions of documentation pages are available by appending `.md` to page URLs; this page is available as [Markdown](https://support.senterasensors.com/home/6x-series-sensors-user-guide/6x-series-sensors/data-offload/data-import/pix4d-fields.md).

# Pix4D Fields

6X Series Sensors Data Import for Pix4D Fields

## Requirements

For use of 6X Series Sensors with Pix4D Fields, we recommend changes to the sensor's configuration. View the support article below for instructions:

{% content-ref url="/pages/4u1wSjJWC6o4M3PRHsTX" %}
[Pix4D Fields Compatibility Settings](/home/6x-series-sensors-user-guide/6x-series-sensors/configuration-and-settings/configuration/pix4d-fields-compatibility-settings.md)
{% endcontent-ref %}

{% hint style="info" %}
This process will disable the built in image processing pipeline on the 6X sensors so that the images can be better processed within Pix4D Fields.

The raw imagery from the sensor will now look different than expected.
{% endhint %}

## Post Processing in Pix4D Fields

{% stepper %}
{% step %}

### Create a New Project

Click **New project** to begin the process.&#x20;

<div data-with-frame="true"><figure><img src="https://816013970-files.gitbook.io/~/files/v0/b/gitbook-x-prod.appspot.com/o/spaces%2F5Jgm6jwRCbkoXyPerUfI%2Fuploads%2FccuoXkir1GhPH9iQQs2R%2F1%20new%20project%20button.png?alt=media&amp;token=d730a7a4-ebbd-4608-9e0d-50877938c277" alt=""><figcaption></figcaption></figure></div>

{% endstep %}

{% step %}

## Upload Monochrome Tiff Imagery

{% hint style="info" %}
Monochrome Tiff files and RGB jpeg files need to be imported and processed separately.&#x20;
{% endhint %}

Select the **Folder** button in the **Captured By Drone** section.&#x20;

<div data-with-frame="true"><figure><img src="https://816013970-files.gitbook.io/~/files/v0/b/gitbook-x-prod.appspot.com/o/spaces%2F5Jgm6jwRCbkoXyPerUfI%2Fuploads%2FJOpthALCmn8lxhwuFNfY%2F4%20upload%20folder.png?alt=media&amp;token=ff2ac62b-b2f9-4b8f-babe-e4f00f79e99c" alt=""><figcaption></figcaption></figure></div>

Navigate to the session folder of your flight, and click **Select Folder**.

<div data-with-frame="true"><figure><img src="https://816013970-files.gitbook.io/~/files/v0/b/gitbook-x-prod.appspot.com/o/spaces%2F5Jgm6jwRCbkoXyPerUfI%2Fuploads%2FPQVTEgPRWJq50t7Tc4mq%2F5%20image%20folder%20selections.png?alt=media&amp;token=eb314abe-9097-496b-b186-011f906f36ca" alt=""><figcaption></figcaption></figure></div>

{% hint style="info" %}
Select the top level folder which contains subdirectories for each band of the 6X Sensor. This will allow you to select all Tiff files contained in each subdirectory. Alternatively you can repeat the process to select the subdirectory for each band.&#x20;
{% endhint %}

Select **tiff files**, and click **continue**.

<div data-with-frame="true"><figure><img src="https://816013970-files.gitbook.io/~/files/v0/b/gitbook-x-prod.appspot.com/o/spaces%2F5Jgm6jwRCbkoXyPerUfI%2Fuploads%2F8Jhkq95vv63C0FARHSvI%2F6%20image%20type%20selection.png?alt=media&amp;token=198580e4-6165-4442-b00f-4855d05ed73e" alt=""><figcaption></figcaption></figure></div>

{% endstep %}

{% step %}

### Monochrome Processing Options

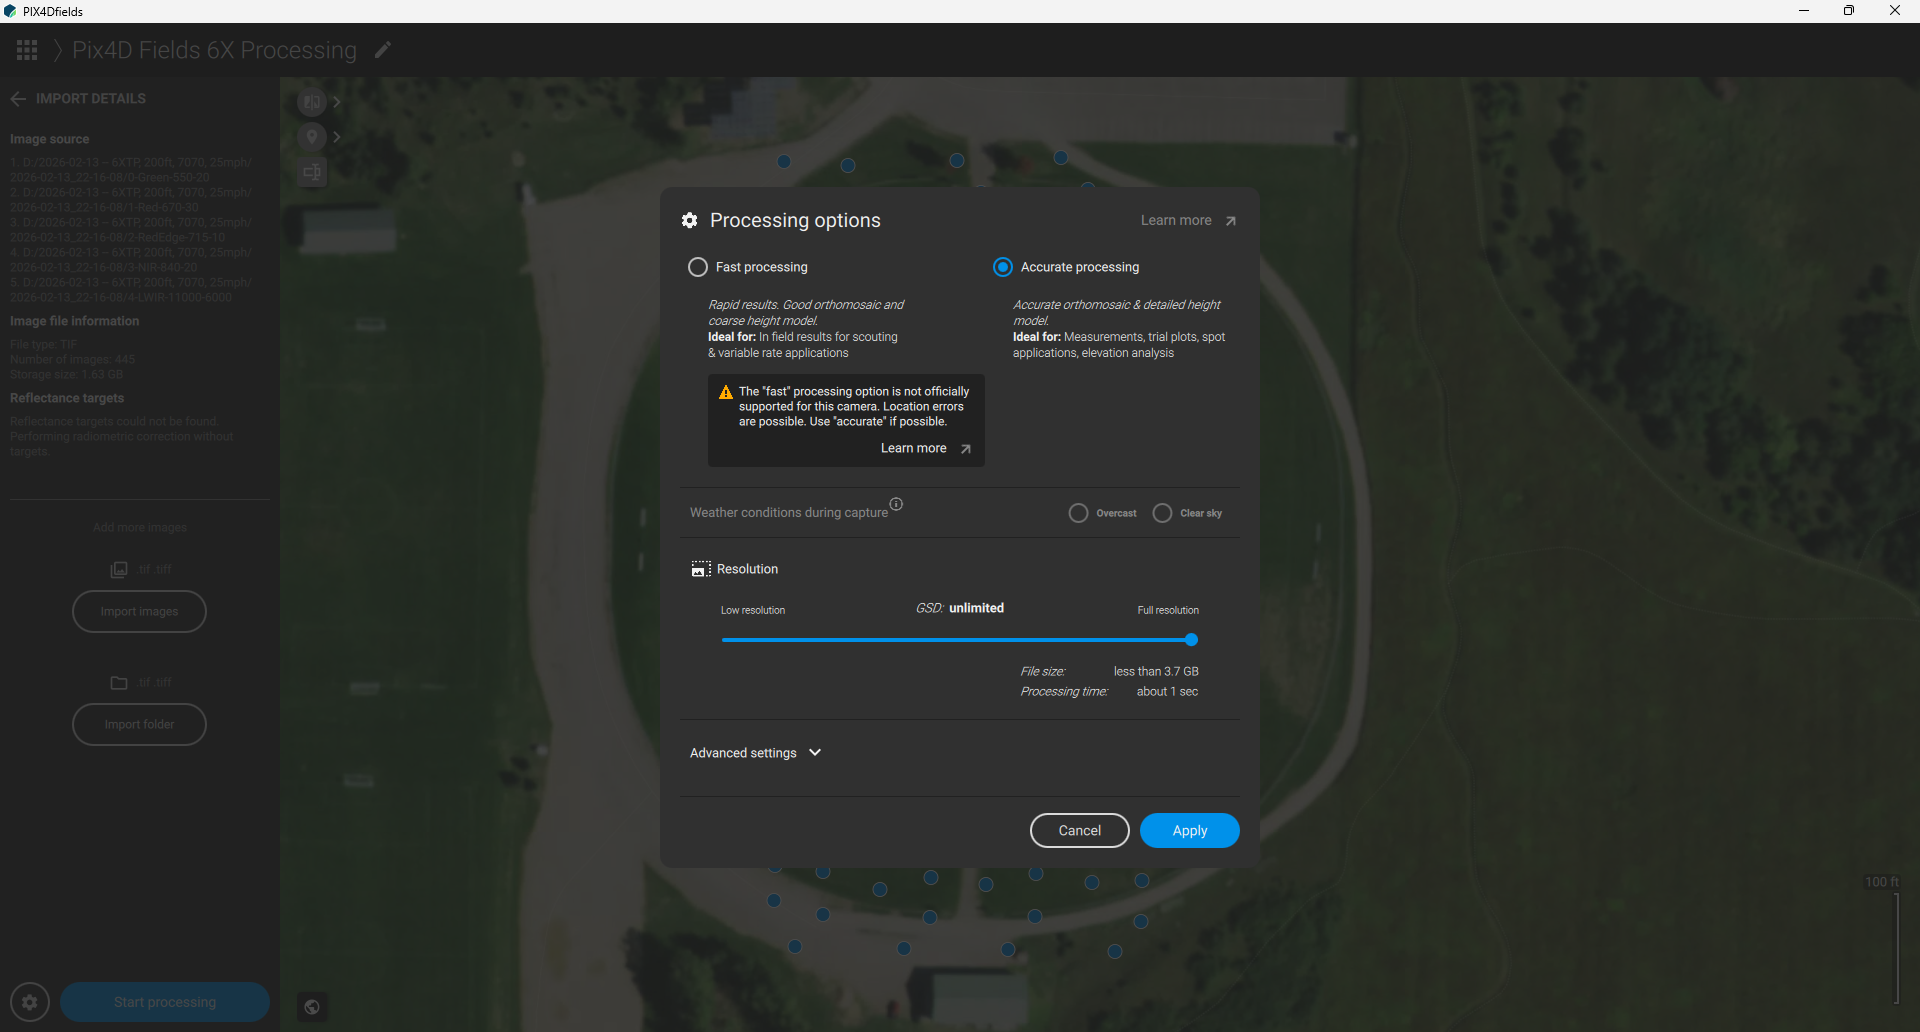
After Images upload the processing options menu will pop up.&#x20;

Select **Accurate Processing**.&#x20;

<div data-with-frame="true"><figure><img src="https://816013970-files.gitbook.io/~/files/v0/b/gitbook-x-prod.appspot.com/o/spaces%2F5Jgm6jwRCbkoXyPerUfI%2Fuploads%2FsEFphULY4Zs2TfhoNbHM%2F9%20accurate%20processing.png?alt=media&amp;token=fef1fea5-7097-4755-8f4b-6fc48894ed08" alt=""><figcaption></figcaption></figure></div>

Click the **Advanced settings** expandable to see additional options.&#x20;

Toggle off **Radiometric correction**, then click **Apply**.

<div data-with-frame="true"><figure><img src="https://816013970-files.gitbook.io/~/files/v0/b/gitbook-x-prod.appspot.com/o/spaces%2F5Jgm6jwRCbkoXyPerUfI%2Fuploads%2Fi3GIc7IcUVkJjREONqnn%2F11%20disable%20radiometric%20correction.png?alt=media&amp;token=28f740ce-75cf-49b7-a21a-37556e229af5" alt=""><figcaption></figcaption></figure></div>

Click **Start processing**.

<div data-with-frame="true"><figure><img src="https://816013970-files.gitbook.io/~/files/v0/b/gitbook-x-prod.appspot.com/o/spaces%2F5Jgm6jwRCbkoXyPerUfI%2Fuploads%2FBBf8mAsdvPWeHgB1aukb%2F12%20click%20start%20processing.png?alt=media&amp;token=1660f973-d112-46b9-9516-bc4ee7c5c93c" alt=""><figcaption></figcaption></figure></div>

{% endstep %}

{% step %}

### Generating Indices

Select the Multispectral **Orthomosaic**, then click the **Index** button&#x20;

<div data-with-frame="true"><figure><img src="https://816013970-files.gitbook.io/~/files/v0/b/gitbook-x-prod.appspot.com/o/spaces%2F5Jgm6jwRCbkoXyPerUfI%2Fuploads%2F7h0Rqwhiec22YgmtDikC%2F14v2%20processed%20default.png?alt=media&amp;token=33654e21-6c61-47e2-9730-3479c35e3569" alt=""><figcaption></figcaption></figure></div>

Select the Index you want to generate from the **Default Indices** menu.

Then click **Generate**.

<div data-with-frame="true"><figure><img src="https://816013970-files.gitbook.io/~/files/v0/b/gitbook-x-prod.appspot.com/o/spaces%2F5Jgm6jwRCbkoXyPerUfI%2Fuploads%2FOG2lUXt3L24ehZIasMxr%2F15%20index%20ndvi%20generate.png?alt=media&amp;token=197953e5-296e-4db1-a053-4615f8d22146" alt=""><figcaption></figcaption></figure></div>

The index generates. It can be viewed by clicking the chosen index under the Multispectral Orthomosaic.&#x20;

<div data-with-frame="true"><figure><img src="https://816013970-files.gitbook.io/~/files/v0/b/gitbook-x-prod.appspot.com/o/spaces%2F5Jgm6jwRCbkoXyPerUfI%2Fuploads%2FsbSGdwaMyhlUO42InT1P%2F16%20ndvi%20generated.png?alt=media&amp;token=bdc26614-ecdc-4ee7-b995-8c20c62d9c88" alt=""><figcaption></figcaption></figure></div>

{% endstep %}

{% step %}

### Custom Index for Thermal Imagery

{% hint style="info" %}
tiff files from the 6X Thermal and 6X Thermal Pro are recorded in CentiKelvin (Kelvin \* 100). To view thermal data in celsius, you must first convert it. Using a custom index in Pix4d Fields will convert the data to celcius.&#x20;
{% endhint %}

Click the **Index** Button.&#x20;

<div data-with-frame="true"><figure><img src="https://816013970-files.gitbook.io/~/files/v0/b/gitbook-x-prod.appspot.com/o/spaces%2F5Jgm6jwRCbkoXyPerUfI%2Fuploads%2FNIXf9brFcmGAIUj2uQOV%2F17%20select%20ortho%20and%20then%20click%20index%20again.png?alt=media&amp;token=0ef34c2e-f68a-4baa-8408-9b011915a38a" alt=""><figcaption></figcaption></figure></div>

Ensure that your source layer is the Multispectral Orthomosaic. If your source is still the previously generated index, use the source drop down to select the Mutlispectral Orthomosaic.&#x20;

<div data-with-frame="true"><figure><img src="https://816013970-files.gitbook.io/~/files/v0/b/gitbook-x-prod.appspot.com/o/spaces%2F5Jgm6jwRCbkoXyPerUfI%2Fuploads%2FzsEJs2EtH6caPN750sgY%2Fimage.png?alt=media&amp;token=8fbfd12e-e13e-4464-a79f-4a620f26eb40" alt=""><figcaption></figcaption></figure></div>

Deselect any default indices and click **Custom index**.

<div data-with-frame="true"><figure><img src="https://816013970-files.gitbook.io/~/files/v0/b/gitbook-x-prod.appspot.com/o/spaces%2F5Jgm6jwRCbkoXyPerUfI%2Fuploads%2FykOtdEhNjovuZXMN3SKv%2F18%20select%20custom%20index.png?alt=media&amp;token=bd5df211-0422-41ea-a74e-a1554d093277" alt=""><figcaption></figcaption></figure></div>

Name the index and enter the thermal conversion formula in the **Formula** box.

{% code title="Thermal Conversion Formula" %}

```
thermal / 100 - 273.15
```

{% endcode %}

<div data-with-frame="true"><figure><img src="https://816013970-files.gitbook.io/~/files/v0/b/gitbook-x-prod.appspot.com/o/spaces%2F5Jgm6jwRCbkoXyPerUfI%2Fuploads%2FAnQE27hXqaZWCFn9H6qF%2F19%20thermal%20formula.png?alt=media&amp;token=4a013a2b-a781-4ce1-9488-9622728d8cfe" alt=""><figcaption></figcaption></figure></div>

Click **Preview**, then click **Apply**.

<div data-with-frame="true"><figure><img src="https://816013970-files.gitbook.io/~/files/v0/b/gitbook-x-prod.appspot.com/o/spaces%2F5Jgm6jwRCbkoXyPerUfI%2Fuploads%2FIrL4pM8VnSBIwlgpMikO%2F20%20preview%20selected%20now%20click%20apply.png?alt=media&amp;token=788332ef-e72d-4c76-a5c3-f7677c6b1375" alt=""><figcaption></figcaption></figure></div>

The Thermal Index generates, and displays values in celcius.&#x20;

<div data-with-frame="true"><figure><img src="https://816013970-files.gitbook.io/~/files/v0/b/gitbook-x-prod.appspot.com/o/spaces%2F5Jgm6jwRCbkoXyPerUfI%2Fuploads%2FJtFluqwuXKsSY3ApNpy6%2F21%20thermal%20map.png?alt=media&amp;token=0a0d3a3a-4568-4eb1-af6e-cb77cbc914a1" alt=""><figcaption></figcaption></figure></div>

{% endstep %}

{% step %}

## Upload RGB JPEG Imagery

Click **Import**.&#x20;

<div data-with-frame="true"><figure><img src="https://816013970-files.gitbook.io/~/files/v0/b/gitbook-x-prod.appspot.com/o/spaces%2F5Jgm6jwRCbkoXyPerUfI%2Fuploads%2FRyB2Cd5zccJruScQ8BnX%2F22%20import%20again.png?alt=media&amp;token=ed3ca61a-8344-476b-8b65-1c96eee04b98" alt=""><figcaption></figcaption></figure></div>

Select the **Folder** button in the **Captured By Drone** section.&#x20;

<div data-with-frame="true"><figure><img src="https://816013970-files.gitbook.io/~/files/v0/b/gitbook-x-prod.appspot.com/o/spaces%2F5Jgm6jwRCbkoXyPerUfI%2Fuploads%2FQ2aCPkNbXCMQhOyZbuAr%2F23%20folder%20for%20rgb.png?alt=media&amp;token=97749849-640f-4d7c-b316-b4a715654b73" alt=""><figcaption></figcaption></figure></div>

Navigate to the session folder of your flight and select the RGB folder. Then click **Select Folder**.

<div data-with-frame="true"><figure><img src="https://816013970-files.gitbook.io/~/files/v0/b/gitbook-x-prod.appspot.com/o/spaces%2F5Jgm6jwRCbkoXyPerUfI%2Fuploads%2FrDJ5VTwteQbP3GsdJJlL%2F24%20rgb%20folder%20in%20finder.png?alt=media&amp;token=791d3bea-f1b9-4c7c-8e3b-983f1d06bb5c" alt=""><figcaption></figcaption></figure></div>

{% endstep %}

{% step %}

### RGB Processing Options

After Images upload the processing options menu will pop up.&#x20;

Select **Accurate Processing**, then click **Apply**.&#x20;

<div data-with-frame="true"><figure><img src="https://816013970-files.gitbook.io/~/files/v0/b/gitbook-x-prod.appspot.com/o/spaces%2F5Jgm6jwRCbkoXyPerUfI%2Fuploads%2FI2okXY37iYlEfsrzaVB3%2F25%20rgb%20accurate%20processing.png?alt=media&amp;token=1ba412ee-3d4f-4c1e-a930-39120b318b31" alt=""><figcaption></figcaption></figure></div>

Click **Start processing**.

<div data-with-frame="true"><figure><img src="https://816013970-files.gitbook.io/~/files/v0/b/gitbook-x-prod.appspot.com/o/spaces%2F5Jgm6jwRCbkoXyPerUfI%2Fuploads%2FwHg309ugur25Qm75pFw3%2F26%20start%20processing%20rgb.png?alt=media&amp;token=55f01805-d0cb-47b6-b6a9-f80980b9f950" alt=""><figcaption></figcaption></figure></div>

The RGB Orthomosaic generates and displays.&#x20;

<div data-with-frame="true"><figure><img src="https://816013970-files.gitbook.io/~/files/v0/b/gitbook-x-prod.appspot.com/o/spaces%2F5Jgm6jwRCbkoXyPerUfI%2Fuploads%2F7apmASRvY0bhgJI35Z0q%2Frgb%20processed.png?alt=media&amp;token=452bd8f6-e4aa-4a30-ad10-598042d88008" alt=""><figcaption></figcaption></figure></div>
{% endstep %}
{% endstepper %}


---

# Agent Instructions
This documentation is published with GitBook. GitBook is the documentation platform designed so that both humans and AI agents can read, navigate, and reason over technical content effectively. Learn more at gitbook.com.

## Querying This Documentation
If you need additional information that is not directly available in this page, you can query the documentation dynamically by asking a question.

Perform an HTTP GET request on the current page URL with the `ask` query parameter, and the optional `goal` query parameter:

```
GET https://support.senterasensors.com/home/6x-series-sensors-user-guide/6x-series-sensors/data-offload/data-import/pix4d-fields.md?ask=<question>&goal=<endgoal>
```

`ask` is the immediate question: it should be specific, self-contained, and written in natural language.
`goal` is optional and describes the broader end goal you are ultimately trying to accomplish on behalf of the user. GitBook uses it to tailor the answer towards what is most useful for that goal.

The response will contain a direct answer to the question and relevant excerpts and sources from the documentation.

Use this mechanism when the answer is not explicitly present in the current page, you need clarification or additional context, or you want to retrieve related documentation sections.