FAQS: How do I use a new MicroSD Card with my Sentera Sensor?
![]() Note: Double 4K - Skyport is formerly known as AGX710.
Note: Double 4K - Skyport is formerly known as AGX710.
First, confirm that you are using a MicroSD Card of the correct size and speed. Speed Specifications:
We recommend using a class 3 (U3 ~ 100mb/s) card
Maximum Card Size Specifications:
Single and Quad Sensors = 32 GB
Double 4K and Skyport = 64 GB
Determining the Format of your MicroSD Card
![]() All SD Cards used in Sentera Sensors, must be in FAT32 format.
To determine the current format of your MicroSD Card:
All SD Cards used in Sentera Sensors, must be in FAT32 format.
To determine the current format of your MicroSD Card:
Insert the MicroSD card into a computer
Locate the MicroSD card in a finder window.
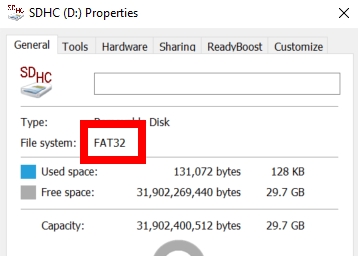
Right click and select properties as shown below.

Check the file system for "FAT32" as shown below.

If your MicroSD Card is already formatted to FAT32, move onto the next section, Using your FAT32 MicroSD Card. In addition, If your SD Card is not formatted to FAT32, follow the instructions detailed in the last section, Formatting an SD Card to FAT32. Using your FAT32
Insert your SD Card into your Sensor and if applicable, install your sensor onto your aircraft.
Power on the aircraft. The Sensor will write the necessary files to the card.
For the Sentera Single Sensor you will see Green, Yellow, and Red LED's. Please wait until the Red LED turns off.
For the Double 4K Sensor or Skyport you will need to wait until you have a solid Green LED.
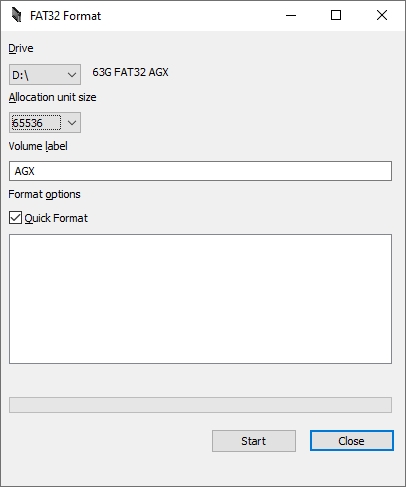
Formatting an SD Card to FAT32 If your SD Card is not formatted to FAT32, you will need to format the card using the tool below as Windows does not support the format natively.
![]() Note: Windows might not download it when clicking on the link as it will say its suspicious, have windows download it anyway.
Note: Windows might not download it when clicking on the link as it will say its suspicious, have windows download it anyway.
Software download link:
Before using the FAT32 Formatter Tool copy it to your Desktop, close Windows Explorer, then launch FAT32 Formatter.

Allocation Size for MicroSD Cards When using the FAT32 Formatter Tool, set it to the appropriate allocation size based on card storage.
16 GB Cards = 16384
32 GB Cards = 32768
64 GB Cards = 65536
You can now insert the newly formatted MicroSD Card in to the Sensor and power on the aircraft. The Sensor will write the necessary files to the card. Make sure you power on the sensor for about 5 minutes with the microsd card in the sensor.
For the Sentera Single Sensor you will see Green, Yellow, and Red LEDs. Please wait until the Red LED turns off.
For the Double 4K Sensor or Skyport you will need to wait until you have a solid Green LED. Typically, you will want to test this outside in order to get a Green LED, i.e., the sensor needs GPS and needs direct line of sight with the sky.
